Food for the kiddos

Food for the kiddos
Showing posts with label rabbit sandwich. Show all posts

Saturday, 22 April 2017

Rabbit Sandwich 2017 Tutorial (Level : Difficult)

When it comes to cutting seaweed for sandwiches, I will always put the level as difficult because it requires a lot of patience and care. The seaweed will be thin and flimsy, easily breakable at times and you need to be careful when handling the cut out seaweed pieces.

Tools Required -
1. A pair of sharp scissors
2. A pair of tweezers
3. A small straw
4. A butter knife

Ingredients Needed -
1. Two slices of bread
2. Breading filling of choice ( ham & cheese for this tutorial)
3. Dried seaweed
4. A dab of strawberry jam
 
I always make the sandwiches using the same method. Find a picture, draw the picture on a piece of paper and cut out it. For this sandwich, I used the cut out as a guide to cut my bread to the same shape. You can use the scissors or the knife to cut out the shape, whichever more comfortable to you). After that I used the dried seaweed and painstaking cut out the seaweed to form the outline of the rabbit, including the eyes and nose. I was so busy cutting and placing the seaweed that I forgot to take any pictures. My bad!
 
As shown in the picture, I used the straw (in red) to make the round dot on the rabbit's eyes.  
Finding the cheese was too thick, I cut it into halves and placed it on the rabbit's eyes.

Once you are done, you should get something like that.

As the bottom slice of bread need not be so precise in shape, it was only a very rough outline and you couldn't even see the bunny shape. Just need to use scissor or the knife to trim the bread to get the shape.
Place the ham and cheese between the bread and trim away the excess like what you did for the bottom slice of bread.
Pointers to Note : I do not like to throw away food so I put the excess bits back into the sandwich

I added some cheek colors to the rabbit using some strawberry jam. You can use the butter knife to do it but I used a chopstick to dab the 'blusher' on the rabbit instead.
I have added two quail eggs, sauce and some fruits to the box.
This should be your completed work!
Have a great day ahead!

Friday, 8 July 2016

Fast Bunny Sandwich for the Morning Rush

It's been quite a while since I made sandwich. On and off I still prepare food for my kids just that I find nothing interesting to post. Today, I decided to complete the sandwich box from scratch within the time limited during morning rush.

I always suggest the prep work to be done the night before. For this sandwich today, I didn't even prepare anything at all...nothing at all. It took me a good 20mins to prepare the 2 sandwiches. 

Steps- 
First thing is to boil the eggs and set the 8mins timer. After that, wash a plate and the rabbit sandwich mold, followed by taking out the ham, cheese and jam from the fridge. Next, I took out my sandwich box, the dried seaweed and the seaweed puncher. Wipe the sandwich box with wet tissues to make sure it is clean. 
Throw the ham and cheese with bread and cut with the mold. Punch seaweed and use the jam to stick to the bread and apply 'blusher' to the rabbit. I started peeling the eggs after I was done with the bread.

To my horror, I realized that I didn't have any fruits for the kids so I raid my cupboard for snacks to fill the box.

It is as easy and quick as described. 

Try it!

Happy weekend!!!


Wednesday, 24 February 2016

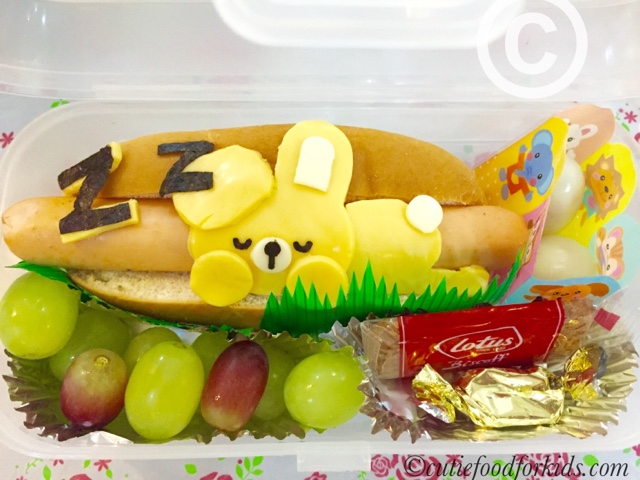
Sleeping Bunny Hotdog Bun

Good Wednesday morning! 

After bringing mummy-made sandwiches to school on Monday, the kids' classmates commented that finally the mummy is making sandwiches again. Humm…did they miss seeing the cute sandwiches?

Possible ideas for the buns
I don't make hotdog bun for my kids very often but since I got some Ikea hotdog at home, I decided to make good use of it. I made a sketch of several possible designs for the bun and the kids unanimously voted for the sleeping rabbit. My personal favorite is the rabbit and cat friend but my customers are always right. Sleeping rabbit it shall be. 
My rabbits did not turn out exactly the way I sketched. I left out the 'blush' on the cheek because there wasn't any more space with the paw blocking the face. I added a small circle to the nose as the initial design was too simple. 
I made each rabbit using only one slice of cheese. Each kid wanted a different colored rabbit so I made use of 2 slices of cheese, Mozzarella cheese and Cheddar cheese. I used a rabbit head mold for the head and a toothpick to curve out the rabbit's body on the cheese. 

Not sure which is cuter but the yellow rabbit is definitely fatter than the white one. I was running out of mozzarella cheese and didn't want to use another slice. Hehehe…
Apart from the bun, I added grapes, quail eggs, a small biscuit and a candy to go along.

The final product of 2 sleeping bunnies! 

I hope the kids can finish everything in the box!

Friday, 14 August 2015

Rabbit Sandwich

I made this rabbit sandwich for the kids yesterday but didn't have time to post. Feeling lazy, I used a rabbit mold and didn't feel like cutting any seaweed. I used the Nutella chocolate instead. After using a toothpick and painstakingly putting the chocolate to form the face, I gave up halfway and switched to my seaweed puncher which was so much faster. Unfortunately, my faulty puncher refused to cooperate with me the morning. So I had to continue with the chocolate until the task was completed. :( 

 I filled the bread with peanut butter and added a color bow to the sandwich.  Not forgetting to add blusher to the rabbit cheeks using strawberry jam to make them more adorable!
The sides include a jelly, an egg with sauce and some cherries. I used some rabbit stickers on the jelly to add more colors to the box.

I am not a cat or dog person but a rabbit person. I love rabbits! The sandwiches were just too adorable. I don't think I want to eat the sandwiches if I make them for myself. Hahaha…. 

Friday, 31 July 2015

Easy Rabbit Sandwich Tutorial

I have prepared buns from bakery for my kids to bring to school today but they wanted me to make them a sandwich. I have been buying buns quite often this month because of a flu bug(a lazy bug is more likely...hehehe...). So I decided to make a easy sandwich for them today.

Stuff required to make the bunny sandwich:
1.Bread
2.Bread filling of your choice
3.Colored paper
4.Toothpicks
5.Cheese
6.Dried seaweed
7.Strawberry jam
Can your spot the differences?

Steps: 

1. To make the rabbit ears, cut colored paper and stick it to toothpicks using double sided tape.

2. Using a bubble tea straw, make a small circle for the rabbit nose.

3. Cut seaweed to form the eyes and nose of the rabbit. 

4. Apply blusher to the sandwich using a dab of strawberry jam.

And that's all your need to do.

I bought a cute egg case and put the egg inside. Complete with sauce, packet nuts, a candy and also a packet of milk for recess.

It's Friday! And it's the last day of the month!!! Hurray!!!

Tuesday, 12 May 2015

Miffy the Rabbit

This week is exam week and frankly, I am in no mood to make any sandwiches. I feel more stressed than my kids when they are having exam and I try my best not to show it. The kids wanted a Miffy Rabbit sandwich with chocolate cereal crunch filling today and I am more than happy to oblige. Miffy is not difficult to make. With my rabbit mold, all I need is to cut out eyes and a 'X' on the dried seaweed. 

I made two different expression, not sure which one looks more authentic. Miffy the Rabbit signature 'X' mouth is distinct but the eyes…I am not so sure. I let the kids be the judge. Haha…
Miffy with Oval Shaped Eyes
Miffy with Round Eyes
Anyway, the small one said Miffy should have oval shaped eyes and told me Miffy needs a Tiara and so I added a food pick to it. Anything that pleases them. After all, they are my customers.

Fingers crossed. Two more papers to go after today.
*sweat*


Monday, 4 May 2015

Sandwiches for April 2015

Sandwiches for April 2015
April was a lazy month for me. I didn't come up with many creations and in fact repeated the buns and croissants sandwich because they were just too convenient, not to mention the use of sandwich cutters too!

I think my favorite is the Mamegoma seal but my big one preferred the Croissant Monster and the small one voted for the Decks of Cards, perhaps it was more colorful.

Anyway, I will try to make more cute sandwiches for my kids next month! 

Promise! Promise!

Monday, 20 April 2015

Bunnies with Different Expressions! Take Your Pick!

The small one was still awake last night when I was drawing the sandwich sketches and so she got to pick what she wanted.  I had a hard time trying to decide which bunny expression for the other kiddo.

Frankly, character sandwich making is not really that difficult. One basic mold can create many different sandwiches for your kids. It is just playing around with the placement of the seaweed, creating different expressions. Take a look at the picture and you can see that the same seaweed cutting can form several different expressions on the same bunny sandwich. Five different expressions for the whole week (Monday to Friday) without the need to crack your brain! 

My small kiddo ordered the bunny with 'XX' eyes and I made one with a sleepy look for the other kiddo. My customers  told me they wanted Pineapple Jam filling for their sandwiches today so it makes my life easier too!

Adding a dab of strawberry jam as blusher makes the sandwich cuter! 

Besides applying blusher to the bunnies, I added a tiara food pick for the bunnies. Over all the sandwich still looks quit plain so I needed to add more colors to the box. 
Bunny with Purple Tiara belongs to Small Kiddo
Bunny with Pink Tiara belongs to Big Kiddo
I didn't have time to decorate the egg and left it as it was. However, I added many colorful animal food picks for the fruits. 

Look so much better with all the colors in the box, right? 

Cheers!

Thursday, 9 April 2015

Sandwiches for March 2015

Humm…I forgot to consolidate the sandwich creations for March 2015 last week. Better late than never. Inspirations for the pig and silly smily cat sandwich creations came from pictures of soft toys while the sobbing girl was created to mark the passing of a great leader. 

There were 8 sandwich creations last month and my kids' favorite was the sleeping bunnies covered by the blanket. 

Sandwich Creations for March 2015
My personal favorite is definitely the sobbing little girl waving the Singapore flag for Mr Lee Kuan Yew!

Which one is your favorite?

Monday, 2 March 2015

Bunnies Bunnies Bunnies

Shops are selling Easter chocolate eggs and bunnies already! Easter is coming! 

The kids wanted an animal sandwich today. I decided to load the sandwich box with bunnies. Peanut butter grape jam bunny sandwich with a smiley face. Initially, my sandwich design only had eyes and a nose but one of my kids asked why the rabbit had no mouth. Customers are always right! I added a smile for the rabbit. 
I made 2 small rabbits using quail eggs and spent a lot of time doing it. Gosh! I really do not like to make small small things. The small eyes were difficult to cut or maybe I was just clumsy. Since I have plenty of mandarin oranges at home, I added few slices of oranges and a small grape. I have used a rabbit sticker on their favorite chocolate biscuit (biscuit with lots of love all the way from Japan)! 

Chinese New Year is not over yet and I said I will make Meh Meh sandwich soon. Tomorrow it shall be!

Saturday, 28 February 2015

Sandwiches for February 2015

Sandwiches for Feb 2015. Which one is your fav?
I have consolidated the sandwich creations for February 2015. It's a short month with lots of extra activities for Chinese New Year so there are only 8 sandwiches for February.

My favorite is the sheep sandwich while the kids voted for the heart-shaped Valentines sandwich because there were lots of candies on it. Which one is your favorite this month?

Chinese New Year is not over so I guess I will try to come up with more CNY related designs. 

Stay tuned. :)

Monday, 2 February 2015

January 2015

January 2015 has come to an end. I looked back and decided to consolidate my sandwich for the month into one picture. I hope I will be conscientious enough to make a picture collage each month. This will also enable me to monitor how often I repeat my sandwich creation. The bunny and the cat with camera are my kids' favorites for last month. Which one is your favourite? :)
Sandwiches for Jan 2015

Tuesday, 27 January 2015

Tsum Tsum I Love You

A friend posting a picture of Tsum Tusm fair on FB and the cute characters have caught my eyes. My kids have downloaded the game and so I decided to make a Tsum Tsum character egg mayonnaise sandwich for them today. Donald Duck is much easier without the fake eyelashes but I cannot think of any blue edible stuff to make a Donald Duck's signature blue hat.

Below is the BEFORE and AFTER look for Daisy Duck. Adding 'makeup' such as fake eyelashes and blusher for the sandwich. Which look do you prefer? The natural look or the made up one? Hahaha….

The duckies sandwich for the day. I have some pieces of mini chocolate buns left so I decided to put it into their sandwich box as well. Included grapes and some of their favorite cookies too! They have reminded me NOT to add an egg to the box today. It's egg mayo sandwich so enough of eggs for the day!

My kids came home and told me that their BFF loves the Miffy sandwich I made for them yesterday. So I made a Miffy for their BFF today. I have informed the mother in advance (incase her girl is allergic to eggs) but the mum preferred a peanut butter sandwich for her kiddo. Anyway, below is the sandwiches for today!


Hope my kiddos find that their sandwich resembles their Tsum Tsum character! :)

Getting Started - How to make a rabbit sandwich

There are a few basic items you must have to make cute sandwiches for kids. There is no need to buy all the fancy molds and seaweed puncher if you are only doing it once a while. You can always buy them over time when you decide to do it very frequently. I have built up my collection of sandwich making tools over time and my favorite hunt for cheap molds and seaweed punchers is Daiso Singapore. 

The items in the picture is all you need to get started :

1. Mental egg shaper ring (it is for making sunnyside up egg) for cutting bread
2. A small pair of sharp scissors (for cutting dried seaweed)
3. A tweezer to pick up the small bits of seaweed
4. Straws of different sizes
5. Round medicine bottle caps or anything round circular stuff you can find at home.

Yap, that's all the tools you need to get started! And most of the items do not cost you anything!!!

In this rabbit sandwich tutorial, we are not using all the tools shown in the picture. We are only using the mental ring, tweezer, scissors and the pink medicine bottle cap.

Basic Ingredient for the Sandwich :
A) 2 slices of bread 
B) Dried seaweed (seasoned seaweed that comes in small individual packs)
C) Jam or any type of filling for the bread
D) Mayonnaise or jam ( to make the seaweed 'stick' on the bread)
Looks like some surgical tools in place :p

STEPS : 
  • Step 1 : Cut the facial expression on seaweed. Place the cutter and seaweed bits on a plate before placing them on the bread to see the effect. Having a seaweed puncher does make it easier but some can be quite costly. Get the punchers only when you are sure that you are making such sandwiches often. No point buying something for one time usage(even if it is just $2) and then leave it in the cupboard to collect dust.
Putting the pieces in place on a plate to see the desired effect

  • Step 2 : Spread jam and cut the bread with the mental ring.

  • Step 3 : Apply the mayonaise thinly behind the seaweed bits and 'stick' it to the bread. For the rabbit nose, use the pink round medicine cap to cut out some cheese before putting the seaweed on the sandwich. You can skip the cheese part if you do not have any cheese at home. 

  • Step 4 : Cut a semi-circle on the remaining bread and use the scissors to cut out the shape of the ears.  Make it into the shape of a teardrop. 2 ears = 2pieces.  

  • Step 5 : To attach the ears to the rabbit, insert the ears between the 2 slices of bread. At this point, the sandwich is completed. 

  • Step 6 (optional) : You can chose to add on more decorations such as a food pick as a ribbon or a bow. In the picture below, I used 2 small ham bits(again can cut the shape using scissors) and a food pick.  You can also add 'blusher' to the rabbit by dotting red strawberry jam on the cheeks!

The Final Product
For the busy mums, I totally understand how difficult to wake up early in the morning. I always prepare the seaweed bits and sometimes the bread(in this case, the ears and round face) and at night after I tuck the kids in bed. When the morning comes, I just need to spread the jam, stick the seaweed on the bread and pack it into the lunchbox.

Monday, 26 January 2015

Miffy Lookalike

MONDAY!!! *yawn*…The kids love Miffy Rabbit so I decided to make it into a sandwich. This is a super easy sandwich to make. I used a rabbit sandwich mold today but the same sandwich can be made without a rabbit mold. Life easier with a mold but you can still come up with the same cute sandwich without it. I will share with you how to make a sandwich with some simple items available in the kitchen in the next post.

I used a scissor to cut out the 'X' mouth and seaweed puncher for the eyes. You can survive without those seaweed punchers by cutting out your own shapes using a pair of sharp scissor. Just need more time that's all.

Peanut Butter Sandwich + Egg + Apple + Cookies
Miffy Lookalike

I made a Miffy Rabbit using rice in 2013 (picture below). When I first started preparing food for my children in 2013, I made rice bento for them to bring to school for lunch.  However, the rice would be cold by lunch time and they were not able to heat up the food. 

I have tried several methods but decided to focus on sandwiches instead. They used to buy a simple sandwich for recess(made up of a single slice of bread and half a slice of cheese) and that's it! With the cute sandwich lunchbox, I will always pack 2 slices of bread, throw in an egg at times, some fruits to go along and not to mention a small bottle of milk for picky eaters. I hope my 2 skinny monkeys can gain more weight over time.

Miffy Rice Bento

I have also used a rabbit egg mold today and it looks pretty good(picture below). Added seaweed for the eyes and nose (not really necessary) because I have some extra seaweed on hand. If the egg is slightly bigger than the mold, there will be some bits squashed flat by the mold. Just trim it off with scissor and it will look prefect.