Food for the kiddos

Food for the kiddos
Showing posts with label tools for sandwich making. Show all posts

Wednesday, 8 April 2015

Super Easy DIY Foodpicks Tutorial

I made a few heart-shaped foodpicks for my kids sandwich box yesterday. They are super easy to make and thought I should share the idea of making simple disposible foodpicks.

STUFF REQUIRED (all shown in the picture below) :
1. Colored paper of your choice (IMPORTANT NOTE : do not use those colored paper that color will run after contact with moisture!)
2. A pair of scissors
3. Double sided tape
4. Toothpicks

*Tip : You could also use those leftover free wrapping paper from the shopping malls instead of buying colored paper! Just make sure it's clean :)
STEPS : Cut out a rectangle and fold into half. Paste the double sided tape to one of the square(blank side) and insert the toothpick in the middle of the square. Fold the other side of the paper to stick on the tape and you will get a square. Cut into heart-shapes as shown in picture.
And you are done! In this case, I used the heart-shaped foodpicks as fishtails in my kids' sandwich box. 
There is no limit on the shape, colors and size for the DIY foodpicks. It really added colors to the sandwich box since I do not use artificial food coloring for my kids' food.

Let your creative juice flow! Try it out!

Wednesday, 1 April 2015

Starry Starry Sandwich

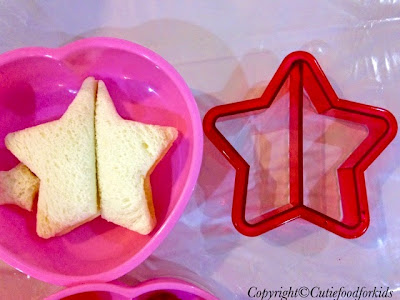
Star-shaped sandwich cutter
Feeling lazy to make a character sandwich today and so I dug out a star-shaped sandwich cutter from the cupboard. This cutter was a free gift that came with some milk powder for my kids. It has been with me for quite some time and finally get to use it today. 

I used kaya and butter for the bread filling. I also included dried apricots and fresh strawberries for the kids, not forgetting their favorite cookies. I reminded them to share the cookies with their friends, if not there will be a sugar rush!

Their sandwich boxes today!
It only took me less than 10 minutes to fill up the box. Quick solution for a lazy me!  I just hope I don't get too used to it. Hehehe…

Friday, 13 March 2015

Silly Smily Cat Sandwich Tutorial

I decided to share this to show that you can actually make a sandwich from a simple cute image that you come across in your daily life. I saw a picture of this cute lovable soft toy and decided to make it into a sandwich for the kids. All I need are my usual tools : mental ring mold, a pair of sharp scissors and a pair of tweezer.
Start by drawing the picture on a piece of paper using the mental ring mold as a guide for the size of the sandwich. This gives an estimate on the size of the features of the cat. 

Step 1 : Use a mental ring to cut the bread (any type of filling you like). 

Step 2 : Cut the shape of the mouth on a piece of white cheese.  If you are unsure how to do it, simply cut your drawing and place the mouth on top of the cheese slice(with the plastic covering still intact) and make a outline on the cheese using a toothpick. Proceed to cut the cheese into the shape required. Use a pair of scissors to cut some dried seaweed for the outline of the mouth, eyes and whiskers. I did all the cutting the night before and kept them in the sandwich box. The cheese went to the fridge of course!

Step 3 : Cut out the shape of the ears for the cat using the scissors. 'Glue' the cheese to the bread by putting some jam on the bread.

Step 4 : Dab some of mayonnaise on the dried seaweed and 'paste' the eyes and whiskers to the bread. I didn't bother to stick the ears and simply put it in a box that fits nicely. You can also choose use more jam to 'stick' the ears.

And it is completed! 

I must say it is easy to put together as long as the preparation work is done the day before. I have roughly 40mins to get everything done in the morning. Everything includes getting myself and the kids ready. 

Practice makes perfect!

Friday, 13 February 2015

Step-By-Step Tutorial - How to make a Cinnamon Sandwich

Cinnamon the Dog
Today I shall share a tutorial on how to make a Sanrio Cinnamon sandwich -

Tools Required : 
1. Mental egg shaper ring
2. A pair of sharp scissors
3. A tweezer to pick up pieces of small seaweed
4. A round medicine bottle cover or any small circular shaped object

Ingredients :
1. 2 to 3 slices of white bread
2. Jam or any kind of fillings
3. Dried seaweed

STEPS :
Cut the bread with a mental ring
Step 1 : Put filling between 2 slices of bread. Bend the mental egg shaper into desired shape and cut the bread as shown in picture below.


Step 2: Use a circular object and cut out a semi-circle on the remaining bread. You can use a medicine bottle cap as well.


Step 3: Use a butter knife or scissor the cut out the shape of the ears. You can also use a pair of scissor to cut. You need to make 2 ears so it is up to you if you want to use a 3rd piece of bread to make another ear or you may just separate the 2 layers into 2 ears(in the picture below). If you are using single layer, it could be left plain or you may wish to apply some jam under it. 


Step 4: Slot the ears between the 2 slices of bread to make sure the size is correct (as shown in picture below). 

Step 5 : Use the scissors to cut out the shape of the mouth and the eyes. I used a seaweed puncher for the eyes since the size is right. If you do not have a seaweed puncher, just fold the seaweed into half and cut out the shape of the eyes. By folding the seaweed into 2, you will get a pair of symmetrical eyes. 


Step 6 : You can prepare Step 1 to 5 in advance. Normally, I will do the preparation work at night after tucking my kids to bed. Below is a picture of the 'mouths' and 'eyes'. I will usually make extra pieces(just in case I drop or accidentally destroy it) and store it in their sandwich box for use the following morning. You can skip this step if you are making it straight away.


Step 7 : Pick up the 'eyes' and 'mouth' using the tweezers. Dap some of jam or mayonnaise behind the seaweed and 'paste' it on the bread. 

Step 8 : Put the ears together and placed it in your sandwich box. It's done! Lastly, you may want to dap some strawberry jam on the cheeks as blusher. 


I hope you enjoyed the tutorial!

Tuesday, 27 January 2015

Getting Started - How to make a rabbit sandwich

There are a few basic items you must have to make cute sandwiches for kids. There is no need to buy all the fancy molds and seaweed puncher if you are only doing it once a while. You can always buy them over time when you decide to do it very frequently. I have built up my collection of sandwich making tools over time and my favorite hunt for cheap molds and seaweed punchers is Daiso Singapore. 

The items in the picture is all you need to get started :

1. Mental egg shaper ring (it is for making sunnyside up egg) for cutting bread
2. A small pair of sharp scissors (for cutting dried seaweed)
3. A tweezer to pick up the small bits of seaweed
4. Straws of different sizes
5. Round medicine bottle caps or anything round circular stuff you can find at home.

Yap, that's all the tools you need to get started! And most of the items do not cost you anything!!!

In this rabbit sandwich tutorial, we are not using all the tools shown in the picture. We are only using the mental ring, tweezer, scissors and the pink medicine bottle cap.

Basic Ingredient for the Sandwich :
A) 2 slices of bread 
B) Dried seaweed (seasoned seaweed that comes in small individual packs)
C) Jam or any type of filling for the bread
D) Mayonnaise or jam ( to make the seaweed 'stick' on the bread)
Looks like some surgical tools in place :p

STEPS : 
  • Step 1 : Cut the facial expression on seaweed. Place the cutter and seaweed bits on a plate before placing them on the bread to see the effect. Having a seaweed puncher does make it easier but some can be quite costly. Get the punchers only when you are sure that you are making such sandwiches often. No point buying something for one time usage(even if it is just $2) and then leave it in the cupboard to collect dust.
Putting the pieces in place on a plate to see the desired effect

  • Step 2 : Spread jam and cut the bread with the mental ring.

  • Step 3 : Apply the mayonaise thinly behind the seaweed bits and 'stick' it to the bread. For the rabbit nose, use the pink round medicine cap to cut out some cheese before putting the seaweed on the sandwich. You can skip the cheese part if you do not have any cheese at home. 

  • Step 4 : Cut a semi-circle on the remaining bread and use the scissors to cut out the shape of the ears.  Make it into the shape of a teardrop. 2 ears = 2pieces.  

  • Step 5 : To attach the ears to the rabbit, insert the ears between the 2 slices of bread. At this point, the sandwich is completed. 

  • Step 6 (optional) : You can chose to add on more decorations such as a food pick as a ribbon or a bow. In the picture below, I used 2 small ham bits(again can cut the shape using scissors) and a food pick.  You can also add 'blusher' to the rabbit by dotting red strawberry jam on the cheeks!

The Final Product
For the busy mums, I totally understand how difficult to wake up early in the morning. I always prepare the seaweed bits and sometimes the bread(in this case, the ears and round face) and at night after I tuck the kids in bed. When the morning comes, I just need to spread the jam, stick the seaweed on the bread and pack it into the lunchbox.