Food for the kiddos

Food for the kiddos

Saturday 31 October 2015

Halloween Tombstone Sandwich 2014

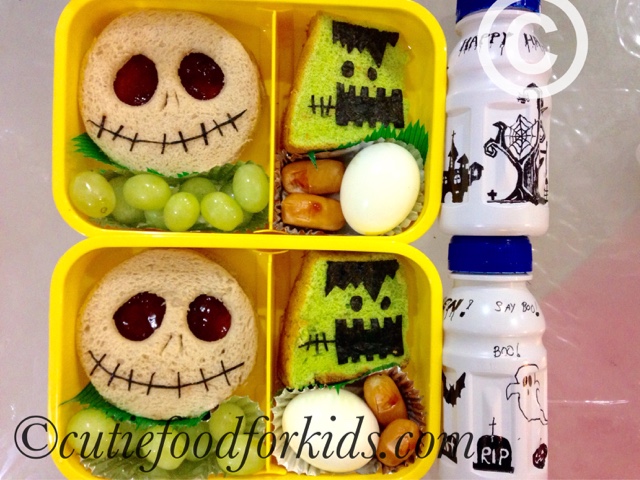
This is a sandwich I made for last year Halloween. It is a relatively simple sandwich to make because you will only need a ghost cookie cutter. The grave is actually 2 slices of bread and you just need to cut out a rectangle and do away with the corners. Using alphabet cutters, I form the words R.I.P on the 'grave'. You can do it without the cutters too! Just use a toothpick and draw on the cheese. I cut seaweed for the face of the ghost and there are eyeballs made of bread in the box too! Using cling wrap to wrap the round bread, I added stickers to it. It is really up to your imagination on how you want the eyeballs to appear. 


I could not resist buying the orange Halloween design bags from my favorite shop (and I still have the bags today). I add funny eyes stickers to the marshmallow and jelly. Not to mention some candies too! What is Halloween without candies for kids, right? :) 

The overall recess pack look spooky enough? :)
Happy Halloween!

Halloween Mummy Sandwich 2013

I dug out old photographs on my phone and found the Halloween sandwiches I made for my kids in 2013. 2 years ago….

Forgive me for the blurry picture. This sandwich has been made using the same mental ring. I covered the bread with strips of cheese and applied some strawberry jam as blood on the mummy. Using a piece of dried seaweed and some marshmallow for the eyes of the mummy and the dangling spider. 

The fat spider below is made from bread and using noodle crackers for the legs. I used chopsticks to poke the eyes. Simple right?
These spiders and spooky heads followed my kids to a picnic. 
They finished all the food without saying. 
Happy Halloween, people!

Friday 2 October 2015

Halloween Sandwich Tutorial (Level : Easy)

This is a easy tutorial on how to make skull sandwich for Halloween. It is super easy and can be done in minutes. No need to sweat a bucket!

Tools Required :
1. A pair of scissors
2. A pair of tweezers
3. A mental ring cutter
4. A small round cap
5. Strawberry jam
6. Dried seaweed
Step 1 : Using the circle mental ring, cut 2 slices of bread into 2 big circles.
Step 2 : Using the small round cap, cut out 2 eyes on the bread and use the scissors to create nostrils on the bread.
Step 3 : Spread the jam on the 2nd piece of bread and complete the sandwich.
Step 4 : Using the scissors, cut the seaweed into thin strips and form the mouth. Using the strawberry jam as 'glue' to stick the seaweed to the bread, apply to bread with the help of the tweezers.

And you will have your Halloween skull sandwich! Simple!
Happy Halloween!

Thursday 1 October 2015

Halloween Sandwich again

Halloween is coming and I get my chance to make creepy sandwiches again!
The kids had to stay back quite late today so I packed more food for their recess cum lunchbox. A skull strawberry jam sandwich, a Frankenstein slice of panda cake, bloody hotdog human fingers, an egg and some fruits.  

The skull sandwich is very simple to make and I will share the steps in another post. 

I used permanent marker to draw on their milk bottles after removing the labels. 

Ta-da! Their spooky Halloween sandwich set! 
Happy Halloween!

Tuesday 22 September 2015

Mid-Autumn Festival Mooncake Sandwich Tutorial (Level: Easy)


Mid-Autumn festival this coming!!! Counting down to 27th September 2015. I have decided to make a super easy sandwich or the kids today to celebrate the festival.

This is a really simple sandwich to make but you need to have the mooncake mold to start with.

Stuff Required -
1. Three slices of wholemeal bread (one must be totally brown, usually the top and bottom of the loaf) 
2.  Filling of your choice
3. Mooncake mold
4. Circular bread cutter (optional)

Step 1 : Cut out the circles on the three slices of bread and apply jam or fillings. Be careful not to apply to the edges. It is easier to work with the bread cutter but the mooncake mold works the same.
Step 2 : Use the plate mold of the moon cake mold and press hard on the brown bread.
Step 3 : Stack them up and you will get your mooncake sandwich as shown in the picture.

Half a dozen of small rabbit quail eggs to go along. Just cut the shapes on dried seaweed or use a seaweed puncher if you have. It is quite difficult to cut small round eyes by hand so a seaweed puncher will save you a lot of time. 

Dab some mayonaise on the seaweed to 'stick' to the eggs. And you will have cute bunny eggs as shown in the picture below.
I didn't prepare any fruits for the kids today so I added a packet of nuts. The sandwich really does look like a real moon cake, doesn't it? :)
Happy Mid-Autumn Festival to all!

Tuesday 15 September 2015

Halloween Sandwich

One week of school holidays is over.
R.I.P.
I finally get down to making a sandwich for the kids today. The Chinese Hungry Ghost Festival is over so now I am making Halloween sandwiches. I do not celebrate Halloween but love making creepy sandwiches. Ha…
There is a limit to the ideas for hotdog buns compared to slices of bread that I can cut and design as desired. I decided to turn the hotdog bun into a coffin with the headstone and wanted something simple and easy. However, I ended up spending quite some time on making the RIP sign and cutting the seaweed for cobwebs. Arghhhh….

The ghost was a last minute addition in the morning since I have the ghost cutter. I added some stickers to create a jelly monster. Quite a lot of food today in the box. 3 quail eggs, a packet of nuts, a jelly and a candy.


Can't wait to create more ghostly sandwiches!

Happy Halloween!

Tuesday 25 August 2015

Chibi Maruko-chan 樱桃小丸子 Sandwich Tutorial (Level: Moderate)

My kids were staying back today so I had to make them some food to bring along. The kids didn't provide any suggestions for their sandwiches and I was pretty clueless too!

As I was preparing all the snacks for the box last night, I came across a Japanese girl on the pack of marshmallow. And she is Chibi Maruko-Chan. I made the sandwich using the picture on the marshmallow.
I am sure this cartoon character has a name but I really do not know her and the packaging is all in Japanese words! Thanks to a friend,  she solved the mystery for me. Her name is Chibi Maruko-Chan 樱桃小丸子!

Sandwich Tutorial :

Stuff Required:
1. Piece of white paper
2. Round mental ring cutter
3. A pair of scissors

Ingredients :
1. Two slices of bread
2. Bread filling of your choice
3. Red strawberry jam
4. Dried seaweed
5. A slice of cheese
6. Bow foodpick
7. Red candy strip(optional)

STEPS -
Step 1 : Draw a round circle using the metal ring cutter and sketch the girl's face on the paper. 
Step 2 : Cut out the hair on the paper(as shown in picture) using a pair of scissors. Using the cut out 'hair', placed it on top of a piece of seaweed and cut out the shape accordingly. As I was using a small piece of seaweed, I had to join the seaweed together to form the hair. 
Step 3: Cut the cheese with the mental ring cutter.
Step 4 : Place the seaweed to form the hair on the cheese slice.

You can do the same for the eyes but I was lazy to cut the paper so I cut a circle and compare the size against my drawing.

Step 5: Cut out seaweed to form the eyes, eyebrows and mouth. The small white dots in the eyes are formed using cheese. You just need a very thin straw to cut it.

Step 6 : Use some red candy to form the mouth or dap the mouth using strawberry jam.

I only add the blusher (strawberry jam) to the cheese in the morning as I need to keep the cheese covered in the fridge.

The cheese is completed.

Step 7 : Cut the bread(with filling) with the mental ring cutter and place the cheese on top of the sandwich.

The two sandwich set comes with quail eggs, strawberries and a packet of marshmallow.


Monday 17 August 2015

Exam! Aces for All Subjects

This week is the exam week and my kiddos are having a paper each day from Monday to Thursday. I can only hope they can score and I try not to stress them too much. Anyway, they don't seem to be too worried. I am the only who is stressed.

I made 4 Aces sandwiches or them today hoping that they can score 4 aces for the 4 subjects!!! Hahaha…
I know they love candy so I added bits of candy for the red heart and red diamond sandwiches. The other two sandwiches are actually peanut butter but I put a piece of dried seaweed for the color. I was in a rush this morning trying to cut and piece the aces on the sandwiches and forgot to add fruits. I added mashmallow and a packet of nuts to go along.  

I pray they can score for the papers this week to make up for the drop last semester. *Fingers crossed*

Friday 14 August 2015

Flower Garden Sandwich Tutorial - Super Easy

Friday!!!! I didn't want to crack my head and make something too complicated for the kids today. I didn't have any clue what to do for the sandwiches last night and slept early instead. Hehehe….hoping to think of something simple for the sandwiches and I could rely on the sandwich bags and stickers if I was clueless. 

After spreading the Nutella jam on the bread, I covered the bread with cling wrap and added stickers. I thought of a monster sicker or a funny face expression sticker initially but that idea can be used in October for Halloween instead. In the end, I decided to make colorful flowers and their favorite almond cookies can act as pebbles or stones in the garden.
This is a relatively simple idea to execute. All you need is…

1. Bread with filling
2. Clingwrap
3. Stickers (and some imagination) 

I added an egg with soy sauce, a jelly and cherries for the sides. The cute sauce containers are not inside the picture as I forgot to include them before taking pictures. hehehe…
Happy Friday!!! Happy Weekend to all!!!

Rabbit Sandwich

I made this rabbit sandwich for the kids yesterday but didn't have time to post. Feeling lazy, I used a rabbit mold and didn't feel like cutting any seaweed. I used the Nutella chocolate instead. After using a toothpick and painstakingly putting the chocolate to form the face, I gave up halfway and switched to my seaweed puncher which was so much faster. Unfortunately, my faulty puncher refused to cooperate with me the morning. So I had to continue with the chocolate until the task was completed. :( 

 I filled the bread with peanut butter and added a color bow to the sandwich.  Not forgetting to add blusher to the rabbit cheeks using strawberry jam to make them more adorable!
The sides include a jelly, an egg with sauce and some cherries. I used some rabbit stickers on the jelly to add more colors to the box.

I am not a cat or dog person but a rabbit person. I love rabbits! The sandwiches were just too adorable. I don't think I want to eat the sandwiches if I make them for myself. Hahaha…. 

Tuesday 11 August 2015

Happy 50th Birthday Singapore

Long weekend is over....

One of my kids was asking me why I didnt make them a National Day sandwich this year. The small one didn't want the usual Singapore flag sandwich(that I have been making them every Auguest for the last couple of years) so I have to come up with something else this year, besides it is the Golden Jubilee we are talking about.

Initially I really didn't know what to do for their sandwich but I came across their school folder while nagging them to lee their homework. The folder was full of iconic landscapes for Singapore and the idea was born. 

I spent almost an hour last night trying to cut the dried seaweed and I only managed to squeeze in the Merlion, Singapore Flyer and Marina Baysand. I wanted to add Changi airport too(because it is easy to cut) but was limited by the size of the cheese. Oh...the two flower thingy on top are suppose to be fireworks. Not sure if my kids got it.

I cut SG50 on the seaweed and pasted it on the egg and top off with Singapore flag. Hey, I DO really really love my tiny country de loh and very proud to be her citizen leh.

The final product for the kids.  I used two different color of cheese just to see which one will turn out better. I think the lighter shade is more outstanding.
Happy 50th Birthday Singapore and many many more to come!!!

Wednesday 5 August 2015

Garfield Sandwich Tutorial (Level:Difficult)

My kids were whining that I make them a Garfield sandwich for school. They have been reading a lot of Garfield comic books and watching Garfield on TV.

I have been using the delay tactics and finally no running away. I have to do it!

I made the Garfield face on cheese the night before and it took me almost an hour to make 2 Garfield faces on cheese. Gosh! A lot of patience required.

This is not an easy tutorial and takes some time(and alot of patience too!).

Ingredients -
2 slices of cheddar cheese
1 slice of mozzarella cheese
2 slices of bread
Bread filling of choice
Dried seaweed

Tools -
A sheet of clean white paper
Mental ring bread cutter
A pair of sharp scissors
A pair of tweezer
A toothpick
A butter knife

Steps -
1. Draw a Garfield picture (size must be the same as the metal ring bread cutter) and cut out the eyes and ears from the drawing.
2. Placed the cut out ears on the cheese and draw on the Mozzarella cheese using a toothpick. Do the same for the eyes and nose.  
3. Using the metal ring, cut the cheddar cheese. Assemble the nose and eyes on the cheddar cheese.
4. Cut 6 small triangles(like Christmas tree) from the dried seaweed and form the strips of Garfield around the face.
5. You need a thin long strips of seaweed for the center and 2 small oval for the eyes. 
6. Cut another 2 long strips of seaweed to form the mouth(this is the difficult part). As you stick the seaweed onto the cheese, the seaweed will soften due to the moisture form the cheese and you will be able to bend the seaweed to a curved line.

Step 1 to 6 should be done the night before unless you are keen to wake up an hour earlier to make this sandwich.

7. Fill bread with desired fillings.
8. Cutting the mental ring bread cutter, cut the bread like the picture show below but do not cut all the way. You need to leave the top part for the ears of Garfield.

9. Put the ears made of cheese on the bread and cut out the shape on the bread using a butter knife.
10. Place the Garfield cheese on top of the bread and you should get the image below.
The sandwich box is completed with an egg, a jelly, a small packet of nuts and a small chocolate treat. Of course I gave them a packet of milk to go along as they were having lunch in school
I hate Mondays!!! But it is not Monday…

The completed work.

Friday 31 July 2015

Easy Rabbit Sandwich Tutorial

I have prepared buns from bakery for my kids to bring to school today but they wanted me to make them a sandwich. I have been buying buns quite often this month because of a flu bug(a lazy bug is more likely...hehehe...). So I decided to make a easy sandwich for them today.

Stuff required to make the bunny sandwich:
1.Bread
2.Bread filling of your choice
3.Colored paper
4.Toothpicks
5.Cheese
6.Dried seaweed
7.Strawberry jam
Can your spot the differences?

Steps: 

1. To make the rabbit ears, cut colored paper and stick it to toothpicks using double sided tape.

2. Using a bubble tea straw, make a small circle for the rabbit nose.

3. Cut seaweed to form the eyes and nose of the rabbit. 

4. Apply blusher to the sandwich using a dab of strawberry jam.

And that's all your need to do.

I bought a cute egg case and put the egg inside. Complete with sauce, packet nuts, a candy and also a packet of milk for recess.

It's Friday! And it's the last day of the month!!! Hurray!!!