Food for the kiddos

Food for the kiddos

Wednesday, 13 July 2016

Pompompurin Tutorial Step-By-Step (Intermediate Level)

As promised, I am going to share the tutorial on how to make the Pompompurin on the slice of cheese using dried seaweed. I thought it would look nicer if I cut the bread into a circular shape and add decoration around the rim, thus 'framing' up the picture. Anyway, I was feeling sleepy and just stick to making the picture on the cheese. Hehehe….

You do not need a lot of stuff to make this but there are a lot of cutting, estimation and drawing/tracing required for this tutorial. Therefore, I categorized it under Intermediate Level instead of Easy Level. Time needed for this will depend on how fast you work. I took more than 20 minutes because I was making 2 Pompompurin.

List of Stuff Needed -
1. A pair of sharp scissors
2. A slice of cheese
3. Dried seaweed
4. A slice of bread
5. A piece of white paper/tracing paper/baking paper
6. A pair of tweezers
I surfed the net and found an easy picture that I could trace/draw on a white piece of paper. I outlined the size of the cheese slice on the paper so that I know exactly how big the picture would appear on the cheese. 


STEPS -
1. Draw/trace the picture on a piece of paper
2. Cut out the hat of Pompompurin from the paper and use it to cut the shape of the seaweed.
3. Place the 'hat' on the cheese slice as shown in the picture. 

4. Use a seaweed puncher to punch out the nose, eyes and mouth. Place it on the cheese in accordance to the picture you drew using the tweezers.

I punch out the eyes and nose as I was too lazy to cut free hand. I find it very difficult to cut a perfect circle especially super small ones. I used the eyebrow of the puncher to create the mouth of Pompompurin. It could be done without the puncher of course, but why torture myself when I could have the easy way out. Ha…
5. There is no way I could punch out the ear that is like a 'J' using the puncher. I had to use the scissors and cut it out on the seaweed. Use 2 pieces of seaweed and cut out the 'J' together. This will ensure that you have 2 symmetrical ears of Pompompurin and save you the hassle of cutting one by one.

There is a lot of agar-ration when making this picture. You can also place the piece of paper over the chefs to ensure the seaweed is placed correctly. However, please be mindful not to let the paper touch the food. After all, no one likes contaminated food.

Happy Pompompurin!!!

Cheers!

Pompompurin Sandwich

I must pick up the pace for making sandwiches for kids. Relied too much on buying sandwiches and using sandwich bags for convenience until I am getting lazy.  

Anyway, I brought my kid to the Pompompurin Cafe during the June school holidays and of course they wanted me to make a Pompompurin sandwich for them. I didn't have time to buy yellow bread so I ended up doing it on a slice of cheese instead. I will share the making of the Pompompurin picture on the cheese in another post. 

I spread jam and instead of putting the cheese into the bread, I lay it on top with the picture of Pompompurin on it. It was kind of last minute put together job and I didn't have any Pompompurin sticker to go along. Desperate, I started drawing on the drink bottles. It was free hand drawing and no room for mistakes. Heng! I managed to pull it off.
I did the seaweed cutting the night before and left it in the fridge. All I need to do in the morning is to spread the jam and place the cheese on bread! 

I added quail eggs, soy sauce, biscuits and fruits to go along. 
Most of their classmates were not familiar with the character but those who went to the cafe, they get it!

Did you get it?

Happy Pompompurin Day!

Friday, 8 July 2016

Fast Bunny Sandwich for the Morning Rush

It's been quite a while since I made sandwich. On and off I still prepare food for my kids just that I find nothing interesting to post. Today, I decided to complete the sandwich box from scratch within the time limited during morning rush.

I always suggest the prep work to be done the night before. For this sandwich today, I didn't even prepare anything at all...nothing at all. It took me a good 20mins to prepare the 2 sandwiches. 

Steps- 
First thing is to boil the eggs and set the 8mins timer. After that, wash a plate and the rabbit sandwich mold, followed by taking out the ham, cheese and jam from the fridge. Next, I took out my sandwich box, the dried seaweed and the seaweed puncher. Wipe the sandwich box with wet tissues to make sure it is clean. 
Throw the ham and cheese with bread and cut with the mold. Punch seaweed and use the jam to stick to the bread and apply 'blusher' to the rabbit. I started peeling the eggs after I was done with the bread.

To my horror, I realized that I didn't have any fruits for the kids so I raid my cupboard for snacks to fill the box.

It is as easy and quick as described. 

Try it!

Happy weekend!!!


Wednesday, 4 May 2016

Cutie Hamster Sandwich

My kids got two hamsters last the weekend and they are super excited about their new pets. The kids requested for a hamster sandwich to bring to school today.  I made this ham and cheese sandwich to keep them happy. They are Fluffy and Almond, their last known names. My kids keep changing the names of their pets and I cannot keep up. Fluffy and Almond, so be it!


I saw some Sumikko gurashi merchandise and one of the animals looked like a hamster to me. Not too sure if it was a hamster but it was round and chubby so I took the hamster sandwich idea from there.  


I used milk bread for this sandwich but frankly, I think wholemeal bread is healthier and will look nicer.  I added grapes, quail eggs and a piece of chocolate biscuits to go along.

Below are some pictures I took when designing the sandwich. It is not a step-by-step tutorial but it will give you a rough idea how it is done. 
The End Product
I used my usual round metal bread cutter and turned it to an oval shape. Using seaweed puncher, I punched out the nose, eyes and whiskers. However, I used a pair of scissors to cut out the paws of the hamster. 

I used the butter knife to cut the pointed ears on the bread.

Dab strawberry jam as blusher and its done. 

It looks like a mouse to me. Anyway, hamsters belong to the rodent family. They are all alike to me. At least, my kids told me that their friends know that it is a hamster sandwich, not a mouse sandwich. Hahaha…

Maybe I should try to make another hamster sandwich that looks more like a hamster instead of a mouse. 

Looking forward to the weekend!

Seal Sandwich Tutorial - Easy

It has been almost 2 months since I made this seal sandwich for the kids. Finally, I get to sit down and share the tutorial on this.

To make the seal sandwich, you will need the following :

Tools -
1. A pair of tweezers
2. Teddy bear sandwich mold
3. Round bottle cap
4. Seaweed puncher or a pair of scissors

Ingredients for a seal sandwich -
1. 3 slices of bread
2. Dried seaweed
3. A slice of cheese
4. Strawberry jam


I used a teddy bear sandwich mold for this seal sandwich as shown in picture below.

Using the ears of the teddy bear mold, I pressed out 2 circles of bread for the fin of the seal. You can use any other round shaped cutter available at home, such as a medicine bottle cap (the pink cap I use to cut the cheese for this tutorial). 

Using a slice of cheddar cheese, I cut the nose of the seal with a medicine bottle cap 

I used a seaweed puncher for this but you can cut out the same shape using a pair of sharp scissor. The seaweed puncher is not a must to have but it does save you a lot of time. 
Lastly, apply blusher the the seals using strawberry jam as shown in the picture. 
Ta-dah! The sandwich is completed. 

Wednesday, 9 March 2016

Seal Sandwich

My kids wanted a Mamegoma sandwich and I made it last Monday for them to bring to school. I was too busy to upload the pictures with a tutorial on it.

I saw a similar sandwich somewhere but decided to create my own since it is not the first time I made a Mamegoma seal sandwich. 

I will share the tutorial on this sandwich in another post.

The kids were happy to have cute sandwiches again!

Wednesday, 24 February 2016

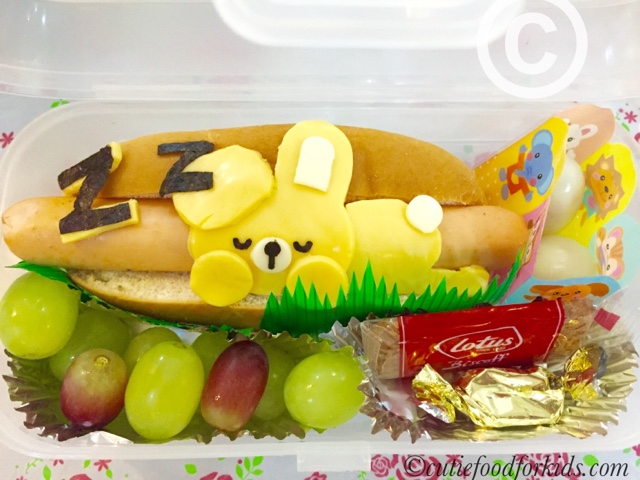
Sleeping Bunny Hotdog Bun

Good Wednesday morning! 

After bringing mummy-made sandwiches to school on Monday, the kids' classmates commented that finally the mummy is making sandwiches again. Humm…did they miss seeing the cute sandwiches?

Possible ideas for the buns
I don't make hotdog bun for my kids very often but since I got some Ikea hotdog at home, I decided to make good use of it. I made a sketch of several possible designs for the bun and the kids unanimously voted for the sleeping rabbit. My personal favorite is the rabbit and cat friend but my customers are always right. Sleeping rabbit it shall be. 
My rabbits did not turn out exactly the way I sketched. I left out the 'blush' on the cheek because there wasn't any more space with the paw blocking the face. I added a small circle to the nose as the initial design was too simple. 
I made each rabbit using only one slice of cheese. Each kid wanted a different colored rabbit so I made use of 2 slices of cheese, Mozzarella cheese and Cheddar cheese. I used a rabbit head mold for the head and a toothpick to curve out the rabbit's body on the cheese. 

Not sure which is cuter but the yellow rabbit is definitely fatter than the white one. I was running out of mozzarella cheese and didn't want to use another slice. Hehehe…
Apart from the bun, I added grapes, quail eggs, a small biscuit and a candy to go along.

The final product of 2 sleeping bunnies! 

I hope the kids can finish everything in the box!