Food for the kiddos

Food for the kiddos

Wednesday, 4 May 2016

Cutie Hamster Sandwich

My kids got two hamsters last the weekend and they are super excited about their new pets. The kids requested for a hamster sandwich to bring to school today.  I made this ham and cheese sandwich to keep them happy. They are Fluffy and Almond, their last known names. My kids keep changing the names of their pets and I cannot keep up. Fluffy and Almond, so be it!


I saw some Sumikko gurashi merchandise and one of the animals looked like a hamster to me. Not too sure if it was a hamster but it was round and chubby so I took the hamster sandwich idea from there.  


I used milk bread for this sandwich but frankly, I think wholemeal bread is healthier and will look nicer.  I added grapes, quail eggs and a piece of chocolate biscuits to go along.

Below are some pictures I took when designing the sandwich. It is not a step-by-step tutorial but it will give you a rough idea how it is done. 
The End Product
I used my usual round metal bread cutter and turned it to an oval shape. Using seaweed puncher, I punched out the nose, eyes and whiskers. However, I used a pair of scissors to cut out the paws of the hamster. 

I used the butter knife to cut the pointed ears on the bread.

Dab strawberry jam as blusher and its done. 

It looks like a mouse to me. Anyway, hamsters belong to the rodent family. They are all alike to me. At least, my kids told me that their friends know that it is a hamster sandwich, not a mouse sandwich. Hahaha…

Maybe I should try to make another hamster sandwich that looks more like a hamster instead of a mouse. 

Looking forward to the weekend!

Seal Sandwich Tutorial - Easy

It has been almost 2 months since I made this seal sandwich for the kids. Finally, I get to sit down and share the tutorial on this.

To make the seal sandwich, you will need the following :

Tools -
1. A pair of tweezers
2. Teddy bear sandwich mold
3. Round bottle cap
4. Seaweed puncher or a pair of scissors

Ingredients for a seal sandwich -
1. 3 slices of bread
2. Dried seaweed
3. A slice of cheese
4. Strawberry jam


I used a teddy bear sandwich mold for this seal sandwich as shown in picture below.

Using the ears of the teddy bear mold, I pressed out 2 circles of bread for the fin of the seal. You can use any other round shaped cutter available at home, such as a medicine bottle cap (the pink cap I use to cut the cheese for this tutorial). 

Using a slice of cheddar cheese, I cut the nose of the seal with a medicine bottle cap 

I used a seaweed puncher for this but you can cut out the same shape using a pair of sharp scissor. The seaweed puncher is not a must to have but it does save you a lot of time. 
Lastly, apply blusher the the seals using strawberry jam as shown in the picture. 
Ta-dah! The sandwich is completed. 

Wednesday, 9 March 2016

Seal Sandwich

My kids wanted a Mamegoma sandwich and I made it last Monday for them to bring to school. I was too busy to upload the pictures with a tutorial on it.

I saw a similar sandwich somewhere but decided to create my own since it is not the first time I made a Mamegoma seal sandwich. 

I will share the tutorial on this sandwich in another post.

The kids were happy to have cute sandwiches again!

Wednesday, 24 February 2016

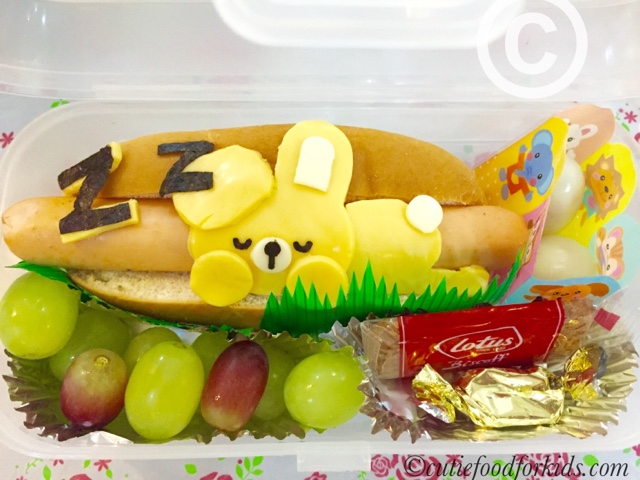
Sleeping Bunny Hotdog Bun

Good Wednesday morning! 

After bringing mummy-made sandwiches to school on Monday, the kids' classmates commented that finally the mummy is making sandwiches again. Humm…did they miss seeing the cute sandwiches?

Possible ideas for the buns
I don't make hotdog bun for my kids very often but since I got some Ikea hotdog at home, I decided to make good use of it. I made a sketch of several possible designs for the bun and the kids unanimously voted for the sleeping rabbit. My personal favorite is the rabbit and cat friend but my customers are always right. Sleeping rabbit it shall be. 
My rabbits did not turn out exactly the way I sketched. I left out the 'blush' on the cheek because there wasn't any more space with the paw blocking the face. I added a small circle to the nose as the initial design was too simple. 
I made each rabbit using only one slice of cheese. Each kid wanted a different colored rabbit so I made use of 2 slices of cheese, Mozzarella cheese and Cheddar cheese. I used a rabbit head mold for the head and a toothpick to curve out the rabbit's body on the cheese. 

Not sure which is cuter but the yellow rabbit is definitely fatter than the white one. I was running out of mozzarella cheese and didn't want to use another slice. Hehehe…
Apart from the bun, I added grapes, quail eggs, a small biscuit and a candy to go along.

The final product of 2 sleeping bunnies! 

I hope the kids can finish everything in the box!

Monday, 22 February 2016

Teddy Sandwich 2016

It has been more than a month since I made sandwiches for my kids. Even their classmates have been asking my kids why their mummy stop making cute sandwiches for them. Hahaha…


My kids told me that they wanted to try all the food in the canteen since the beginning of the year and I decided to take a break while they try out the food. Now there are certain days that sell food they like such as Laska and Chicken Chop. So on these days, I do not need to make any sandwiches for them. Now the routine has been set so I am only tasked to prepare food for them on 2 days a week at most.


Phews!

Monday is a long day for them as they need to stay back until 5pm. I made their favorite ham and cheese sandwich as requested. 
I made 2 different facial expressions on the teddy bear today and added a smily face on the eggs. Using mental heart shaped cutter, I made heart-shaped apples today because I didn't have any fruits suitable for their lunchbox. I soaked the pre-apples in salt water, hopefully the apples will not turn brown too soon.
Which bear is cuter? Kekeke…

Friday, 8 January 2016

1st Sandwich for 2016 - Cutie Faces

It is the first sandwich for school this year and I bought this tofu print from my favorite shop. My kids were so impressed when they saw it this morning. It gives me an idea to use all my cookie cutters for bread designs and will save me a lot of time.


I just need to spread their latest favorite jam on the bread and press the cute prints on the bread. There are quail eggs with soy sauce and fruits to go along. On top of that, I added a packets of nuts and a bottle of milk for the kids since it is going to be a long day for them. 

Not too sure what they want for fruits so I added blueberry, cherries and raspberries. The more the merrier!

Have a great weekend!

Saturday, 31 October 2015

Halloween Tombstone Sandwich 2014

This is a sandwich I made for last year Halloween. It is a relatively simple sandwich to make because you will only need a ghost cookie cutter. The grave is actually 2 slices of bread and you just need to cut out a rectangle and do away with the corners. Using alphabet cutters, I form the words R.I.P on the 'grave'. You can do it without the cutters too! Just use a toothpick and draw on the cheese. I cut seaweed for the face of the ghost and there are eyeballs made of bread in the box too! Using cling wrap to wrap the round bread, I added stickers to it. It is really up to your imagination on how you want the eyeballs to appear. 


I could not resist buying the orange Halloween design bags from my favorite shop (and I still have the bags today). I add funny eyes stickers to the marshmallow and jelly. Not to mention some candies too! What is Halloween without candies for kids, right? :) 

The overall recess pack look spooky enough? :)
Happy Halloween!