Food for the kiddos

Food for the kiddos

Tuesday 1 November 2016

Pikachu Sandwich Step By Step Tutorial (Level : Difficult)

Finally I am settling down in front of the PC to update my blog. It was the exam period and time flew by! I even missed Halloween which is one of my favorite sandwich making season.

Back to this tutorial. This tutorial requires more time and effort, therefore I placed it under the difficult level. Ingredient used are basically the same as my previous 2 Pikachu sandwiches just more time needed to crave out the character using dried seaweed. It took me more than 30 minutes to complete the Pikachu on the 2 slices of cheese slice. This time I tried to snap more pictures to share.

Ingredients -
1. Two slices of bread with filling of your choice
2. One slice of cheddar cheese
3. One slice of white cheese
4. One piece of crabstick or flat red candy strip 
5. Dried Seaweed


Tools -
1. A pair of sharp scissors
2. A toothpick
3. A pair of tweezers
4. A small straw


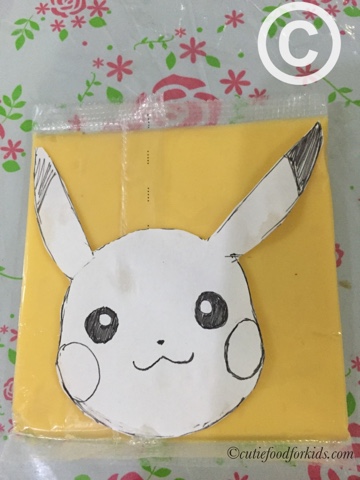
I copied the picture on a piece of white paper and cut out the Pikachu. The picture should fit the size of the cheese slice. Using a toothpick, I outlined the picture on the cheese. For hygiene purpose, I outline the picture on the cheese with the plastic sheet still on.
After that I cut out the Pikachu eyes on the dried seaweed. This requires abit of estimation.
Look at the comparison of my cut out seaweed on the picture. This gives a good gauge of the size of seaweed you need. 
Next, use a small straw to poke a tiny piece of white cheese. Add the small round dot of white cheese to the Pikachu eyes. Note : I will just use the remaining cheese as filling for the sandwich to cut down on food wastage.
 
Cut out the seaweed for the remaining nose and mouth. You can see the face forming on the cheese slice.
I moved on to the arms and using the same method. Cut the seaweed and compare it against the length required. Place the dried seaweed on the cheese slice.
Next, carve out the outline using a toothpick. You should be able to see the lines on the cheese slice that was previously drawn with the plastic sheet on.
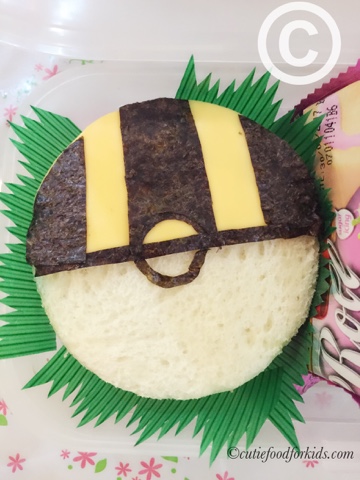
Lastly, cut the dried seaweed in accordance to the size of the ear and tail. 
Place the seaweed on the tail and ear.
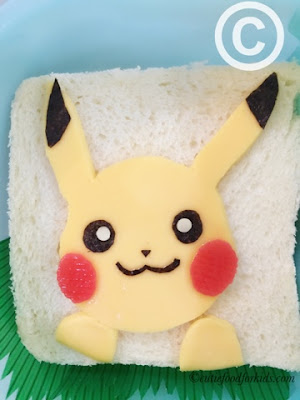
The end product!
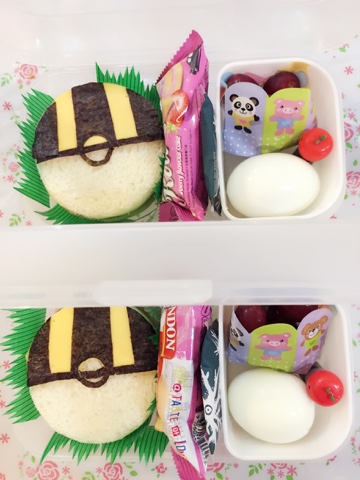
This is how it looked in the box!
3 different designs of Pikachu sandwiches in total.

MAKE THEM ALL!

Cheers!!!

Friday 14 October 2016

Pikachu Sandwich No. 3 (Again!)

Finally I got myself to make sandwich again. This is the 3rd Pikachu sandwich and I guess I need to make another character soon. My kids were saying 'Pikachu again?' when they saw me making the sandwich. This sandwich is definitely more challenging than the last 2 Pikachu sandwiches I made with the use of more dried seaweed to create the Pikachu with folded paws. I will share this sandwich making tutorial in another post.
I wanted the kids to try some greens but I guess they will be super generous to share all the lettuce with their friends. I hope by seeing their friends munching the vegetables, some will go into my kids' tummy also.  *fingers crossed*
I added lettuce, ham bits, egg and their favourite, dried cranberries! They love the Japanese soy salad sauce and I have packed into a separate piggy container.  Sweet stuff a must to entice my kids to finish everything in the box, so I have to squeeze in 2  little white balls of marshmallow into the box.
Looking at the past 2 sandwiches, I think today's sandwich is the cutest of them all!
What do you think?


Thursday 29 September 2016

Pikachu Sandwich - Step By Step Tutorial (Easy)

Time to share the making of the Pikachu sandwich. I labelled it as easy because you do not need a lot of tools to get it done. I spent less than half an hour to complete the Pikachu on the 2 slices of cheese.

Tools Required -
1. A pair of scissors
2. A toothpick
3. A pair of tweezers
3. A small straw

Ingredients -
1. 2 slices of bread
2. 1 slice of cheddar cheese
3. Dried seaweed
4. Red strip candy / tomato sauce
5. 1 slice of white cheese

I drew the Pikachu on a piece of paper that fit the size of the cheese. You can always print from the Internet if you are too lazy to draw.

 Step 1 -  Cut out the shape of Pikachu and placed it on top of the cheese slice. Use a toothpick and outline the picture on the cheese. Dot of the eyes, nose and mouth to make markings on the cheese.


Remove the plastic covering of the cheese and use the toothpick to outline the picture on the cheese again.
Step 2 -  Cut out the eyes of the Pikachu on the paper. Using it as a guide, cut out dried seaweed in the exact same shape as the eyes and placed on the seaweed. You should know where to place the eyes as there should be marking made on the cheese in Step 1.
You can use the paper as a guide as well.
Step 3- Use a small straw and poke on a slice of white cheese. If you do not have any white cheese, simply replace the white cheese with a small piece of flatten white bread.

Using the tweezers, place the white dot of cheese on the eyes

Step 4 - Cut a small oval on the red candy strip for the red cheeks of Pikachu. If you are unable to get hold of such candy, you can use a piece of crabstick or even some red jam as replacement. It will be more tricky to use jam as it might slide off the cheese. My kids do not like crabstick so I had to use the strip of candy instead.


Step 5 - Cut a small triangle for the nose and a wavy shape for the mouth. Add some seaweed to the tip of the ears as well. Always compare the seaweed shape to the drawing or printout for a more accurate picture.
And your completed Pikachu on a slice of cheese!
Lastly, you can add the paws of Pikachu with the extra cheese by cutting out 2 semi-circles with the toothpick. I kept the cheese in the fridge and just place it on the bread in the morning. Usually, I will throw all the leftover cheese as extra filling for the sandwich to reduce wastage.

So try it out!

Catch Them All!


Tuesday 20 September 2016

Pikachu Sandwich Again

I am so not done with Pikachu. I did 3 sketches and this is the 2nd one. I made this last week but didn't have the time to share it. 

My kids are now known as Pikachu killers by their classmates when their classmates saw my kids eating their sandwiches. Hahahaha....

Anyway, the method to make this sandwich is the same as the Pikachu tutorial that I shared earlier on. The only different is that I used ham to create the tongue. 
I made ham and cheese sandwich and added quail eggs and grapes into the box. 
This is the sketch that I used for making the sandwich. 
I will not write another tutorial post on this since it is basically the same method used for the first Pikachu sandwich. However, I will still share some pictures for making this sandwich here.  
Creating the Pikachu on the slice of yellow cheese and I made two Pikachu for my two kids. 


My kids find this Pikachu cuter but they are all the same to me. 


Thursday 15 September 2016

Pokemon Go - Pikachu Sandwich

It is Mid Autumn Festival today. I was torn between making a Pikachu sandwich or a mooncake sandwich for the kids. Since I promised the kids another Pokémon sandwich, I decided to go along with Pikachu. Pikachu is one of their favorite and it is relatively simple to do. I will share the tutorial in another post.

I made a few sketches of Pikachu and decided to start with the simplest one. I used a toothpick to outline the cheese, thus creating the Pikachu's head. I did this the night before so that I could catch a few more winks in the morning. Just slap the cheese on sandwich in the morning and it is done.

The recess box consisted of an egg, some grapes and a mochi. I wanted to turn the egg into a Pokeball but I didn't have the time.
Anyway, Happy Mid Autumn Festival!!!

Tuesday 13 September 2016

Pokemon Go Sandwich - Ultra Ball

School holidays over. It's been a long time since I last made sandwiches for my kiddos. With the latest craze of Pokemon Go, I made them a Pokemon Go sandwich. I didn't have time to make those cute Pokemons sandwich yet so I came up with something simple. 
Instead of the regularly red Pokeballs, I made the yellow Ultra ball sandwich for my kids. 
At least their friends will know what this sandwich is about. 

I will try to make a cuter sandwich for them soon.

Tuesday 9 August 2016

Singapore National Day Sandwich

Been busy doing some assignments that I didn't have time to make sandwiches for the kids.

For the past few years without fail, I will make National Day sandwich for the kids. However, I give this year amiss as I was really tied up.

Anyway, just to share the past 3 years' National  Day sandwich that I made instead.
It all started with the Singapore flag as I was doing he same thing since they were in kindergarten. 2014 was still the same flag but last year was SG50, so I made a special sandwich to commemorate the occasion. 

I really hope I can find time to continue making cute sandwiches for my children. After all, in a few years time, they would not be little kids anymore wanting eat my sandwich creations. Definitely not looking forward to that day. They grow up too quickly!

Happy National Day! Happy Birthday Singapore!

Wednesday 13 July 2016

Pompompurin Tutorial Step-By-Step (Intermediate Level)

As promised, I am going to share the tutorial on how to make the Pompompurin on the slice of cheese using dried seaweed. I thought it would look nicer if I cut the bread into a circular shape and add decoration around the rim, thus 'framing' up the picture. Anyway, I was feeling sleepy and just stick to making the picture on the cheese. Hehehe….

You do not need a lot of stuff to make this but there are a lot of cutting, estimation and drawing/tracing required for this tutorial. Therefore, I categorized it under Intermediate Level instead of Easy Level. Time needed for this will depend on how fast you work. I took more than 20 minutes because I was making 2 Pompompurin.

List of Stuff Needed -
1. A pair of sharp scissors
2. A slice of cheese
3. Dried seaweed
4. A slice of bread
5. A piece of white paper/tracing paper/baking paper
6. A pair of tweezers
I surfed the net and found an easy picture that I could trace/draw on a white piece of paper. I outlined the size of the cheese slice on the paper so that I know exactly how big the picture would appear on the cheese. 


STEPS -
1. Draw/trace the picture on a piece of paper
2. Cut out the hat of Pompompurin from the paper and use it to cut the shape of the seaweed.
3. Place the 'hat' on the cheese slice as shown in the picture. 

4. Use a seaweed puncher to punch out the nose, eyes and mouth. Place it on the cheese in accordance to the picture you drew using the tweezers.

I punch out the eyes and nose as I was too lazy to cut free hand. I find it very difficult to cut a perfect circle especially super small ones. I used the eyebrow of the puncher to create the mouth of Pompompurin. It could be done without the puncher of course, but why torture myself when I could have the easy way out. Ha…
5. There is no way I could punch out the ear that is like a 'J' using the puncher. I had to use the scissors and cut it out on the seaweed. Use 2 pieces of seaweed and cut out the 'J' together. This will ensure that you have 2 symmetrical ears of Pompompurin and save you the hassle of cutting one by one.

There is a lot of agar-ration when making this picture. You can also place the piece of paper over the chefs to ensure the seaweed is placed correctly. However, please be mindful not to let the paper touch the food. After all, no one likes contaminated food.

Happy Pompompurin!!!

Cheers!